With the help of conditional logic and data lookups, you can collect either full payments or deposits on your forms using one of the two methods below.
Pay deposits with a card on file
Organizations on the Team and Enterprise plans have the ability to collect card on file payments in Stripe or Square. If you use PayPal to process payments, please see the alternate method below.
The Card on File feature (available for Stripe and Square) enables you to capture a customer’s card information and then charge them later. In the example below, we’ll set up a form that allows customer to pay in full or pay a deposit. Once they submit the form, their card information will be saved in Stripe or Square.
To pay deposits with a card on file:
Connect your Stripe or Square account to your form.
Set up your payment form. You can start from scratch, or download our pre-built template. Our template includes two Choice fields – one containing the main selections, and another containing some optional add-ons. If you are building your own form, make sure to toggle on ‘Collect Payment’ under the Choice Options for the appropriate fields before continuing.

Add a Calculation field to your form. Set it to the Currency type, and label it ‘Subtotal’. For the calculation, add up all the payment fields on your form by inputting the = sign into the field and selecting all of the form’s payment fields. Ex:
=ChooseYourOption_Price+ChooseAddons_PriceAdd a Choice field to your form to ask the customer if they would like to pay in full or pay a deposit.
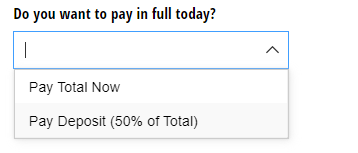
Add a Price field to your form and label it something like ‘Amount Due Today’. Set the Amount to conditionally charge the customer either the full price or a deposit, depending on what they indicated in the Choice field. In the below example calculation, we’re telling the form that if the user chooses ‘Pay Total Now’ in the ‘Do you want to pay in full today?’ field, then the ‘Amount’ field should equal the ‘Subtotal’ field. Or, if the user chooses ‘Pay Deposit’ then the ‘Amount’ field should equal the ‘Subtotal’ field divided by 2.
=If DoYouWantToPayInFullToday = "Pay Total Now" then (Subtotal) else if DoYouWantToPayInFullToday = "Pay Deposit (50% of Total)" then (Subtotal)/2 else 0Set the Item Name to include the values chosen from the Choice fields. Ex:
=ChooseYourOption + (if ChooseAddons.Count()>0 then " with " +ChooseAddons else null)And, set the Item Description to indicate which payment option they chose. Ex:=DoYouWantToPayInFullTodayAdd another Calculation field and label it something like ‘Remainder to be paid’. Set it to the Currency type, and set the calculation to display the amount that the customer still owes if they chose to pay a deposit. Ex:
=if DoYouWantToPayInFullToday = "Pay Deposit (50% of Total)" then (Subtotal)/2 else 0In the Payment Settings (found in the green bar at the bottom of the Build page), set Keep Card on File to When and include an expression to only keep the card on file when the customer chooses to pay a deposit.

Pay deposits with a second payment form
Organizations on the Team and Enterprise plans have the ability to create data lookups.
If you’re using PayPal to process payments (or would simply prefer to handle the second half of payment in Cognito Forms), you can create a second form that allows the customer to pay the rest of their deposit. In the example below, we’ll be able to pull through the customer’s name, address and email address from the previous form, as well as the balance to be paid.
To pay deposits with a second payment form:
Build your first payment form by following steps 1 - 7 in the section above.
Add an Email field to your form. Here, the customer will enter the same email they used on the first payment form.
Add a Lookup field to your form. Under Look Up Choices From, select the first payment form. For the Choice Label option, use the Insert Field dropdown to select the Email field.
For the Include option, set the Email field on your first payment form to equal the Email field on this form. Then, set the Default Choices option to the same condition. We’re using these expressions to check if the customer’s email address matches the address they entered on the first payment form.

Set your Lookup field to show Internally or Never.
Open your Email field settings, and select Show Custom Error - When. Set a custom error to display if the email entered on this form does not match any of the emails submitted to the first payment form. Ex:
LookupEmail.Email is not Email

Make sure to include a custom error message. Ex: “We could not locate your email address. Please try a different address.”

Add two Textbox fields to your form, and set these fields to Read-Only - Always. Label the fields ‘Name’ and ‘Address’, and set the Default Value for each of these fields to their respective fields on the first payment form. Ex:
=Lookup.Name.FirstAndLastand=Lookup.AddressThis will auto-populate the customer’s information from the first form. You can do this with any other relevant fields from your first form as well.

Add a Price field to your form. Here, we’re going to reference the ‘Remainder to be paid’ calculation on the first payment form. Ex:
=LookupEmail.RemainderToBePaidSet the Item Name to equal the options on the first form. Ex:
=LookupEmail.ChooseYourOption + (if LookupEmail.ChooseAddons.Count()>0 then " with " +LookupEmail.ChooseAddons else null)Finally, set the Item Description to a descriptive value. Ex: “Second payment”.