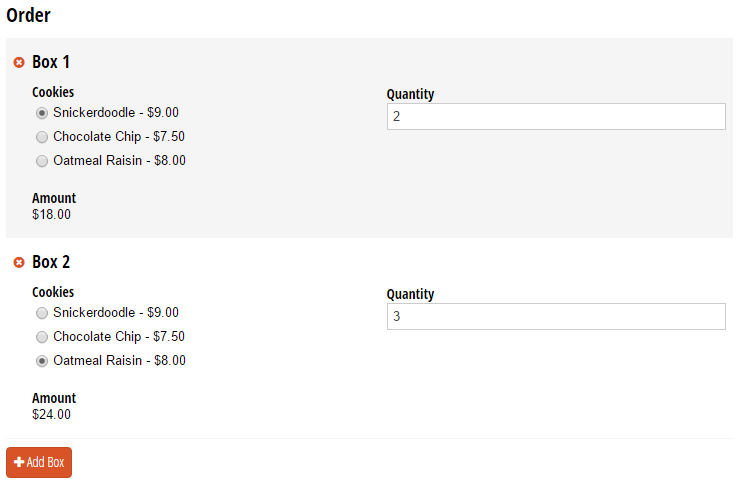
Say hello to the newest member of the field family: the Table field! The Table field is nearly identical to a repeating section, but with a little twist: it allows you to collect up to eight columns of data in a slim grid format with columns and rows. Plus, repeating sections can be easily converted to table fields at any time, and vice versa. So, with the click of a mouse, you can take your order form from this:
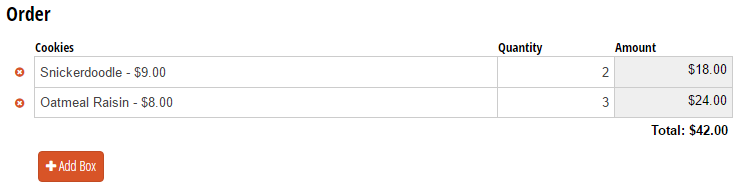
To this:
How does this thing work?
Table fields are a great solution for forms like employee expense reports, which are typically set up in a grid format with columns and rows. To create your table:
Step 1
Select the Table field from the Add Field list. Then, set the Field Label, Item Label, and the minimum and maximum number of items that you want your employees to include.
Step 2
Choose between several different field types and add up to eight columns to construct your table. For an expense report, we’ll use:
- A Date field.
- A Choice field with different expense type options; including Meal, Entertainment, Mileage, Rental Car, Lodging, Taxi, Conference Fees, etc.
- A Currency field for the employee to indicate the cost of each expense.
Step 3
With the magic of resizable fields, click and drag your fields around until they’re spaced exactly the way you want. You can also use ‘Justify Row’ to make each field evenly sized.

Step 4
Similar to other fields, columns in a table field can be set to required, to show conditionally, or to display a custom error. What sets columns apart, however, is the ability to add a column summary; for example, we can add a summary to the bottom of our Amount column that automatically sums the total cost from each row. After we give the summary a label (this is optional), we get this:
You can perform a whole host of other functions, including the average, minimum, maximum, and even custom values. Once you’re done with your table field, add another Currency field beneath it for the employee to indicate the amount that the company has already paid.
Step 5
Finally, add a Price field to calculate the total amount due to the employee. To do this, reference the total cost from the table field by indicating the table name, column name, and summary. Then, simply subtract the amount already paid by the company:
=Expenses_Amount_Summary - LessAmountPaidByCompany
And here’s the final result:
For more information about table fields, refer to our help topic. Have any questions about Cognito Forms? Feel free to get in touch!

Nadia A.
Nadia, the Technical Writer for Cognito Forms, develops documentation, support content, and how-to videos. No matter your experience – with her help, you'll be able to take full advantage of the product. In her spare time, Nadia enjoys listening to French house, drinking coffee, and talking about herself in third person.