It’s important to let your customers know exactly when your business operates – but rather than just telling them, why not actually enforce your business hours through your form? Using some simple calculations and a bit of conditional logic, you can make your form available (or unavailable) at any time of day.
1. Hide your form on certain days and hours
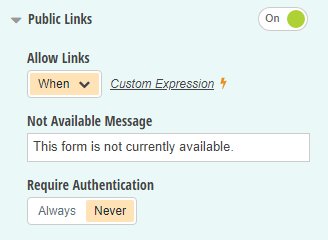
Under your form’s Workflow menu, find the Public Links option and set Allow Links to When. Now, using the calculation editor, you can set the rules that determine when the form should be available.
Let’s say that your business operates from Monday through Friday. Use the following expression to limit the form availability based on the day of the week:
=(DateTime.Today.DayOfWeek = "Monday") or
(DateTime.Today.DayOfWeek = "Tuesday") or
(DateTime.Today.DayOfWeek = "Wednesday") or
(DateTime.Today.DayOfWeek = "Thursday") or
(DateTime.Today.DayOfWeek = "Friday")
Next, let’s say that your hours of operation are from 8:00AM to 5:00PM. In this case, you can use the DateTime.Now property to ensure that users can only access the form within that time range (using UTC/GMT):
=(DateTime.Now < DateTime.Today.AddHours(17).AddMinutes(0)) and (DateTime.Now > DateTime.Today.AddHours(8).AddMinutes(0)) and
(DateTime.Today.DayOfWeek = "Monday") or
(DateTime.Today.DayOfWeek = "Tuesday") or
(DateTime.Today.DayOfWeek = "Wednesday") or
(DateTime.Today.DayOfWeek = "Thursday") or
(DateTime.Today.DayOfWeek = "Friday")
If your business hours are different depending on the day, you can combine the DateTime.Now and DateTime.Today properties to change the hours of operation based on the day of the week:
=(DateTime.Today.DayOfWeek = "Monday") and (DateTime.Now < DateTime.Today.AddHours(17).AddMinutes(0)) and (DateTime.Now > DateTime.Today.AddHours(8).AddMinutes(0)) or (DateTime.Today.DayOfWeek = "Tuesday") and (DateTime.Now < DateTime.Today.AddHours(17).AddMinutes(0)) and (DateTime.Now > DateTime.Today.AddHours(8).AddMinutes(0)) or (DateTime.Today.DayOfWeek = "Wednesday") and (DateTime.Now < DateTime.Today.AddHours(17).AddMinutes(0)) and (DateTime.Now > DateTime.Today.AddHours(8).AddMinutes(0)) or (DateTime.Today.DayOfWeek = "Thursday") and (DateTime.Now < DateTime.Today.AddHours(17).AddMinutes(0)) and (DateTime.Now > DateTime.Today.AddHours(8).AddMinutes(0)) or (DateTime.Today.DayOfWeek = "Friday") and (DateTime.Now < DateTime.Today.AddHours(17).AddMinutes(0)) and (DateTime.Now > DateTime.Today.AddHours(8).AddMinutes(0))
Finally, don’t forget to include a custom message to display when the form is not available (ex: “This form is not currently available.”).
2. Limit selection based on time and day of week
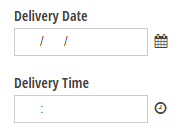
Rather than hiding your form, you may want to limit the dates/times that your users can select. Let’s say, for example, that your Pizzeria that only delivers between 9AM to 5PM during the week, 10PM to 3PM on Saturdays, and 12PM to 3PM on Sundays. In this case, you can take advantage of the Range function in your field settings to specify the days and hours that a user is allowed to select.
First, set the Range Minimum value for your Delivery Time field to the following:
=DeliveryDate.DayOfWeek = "Saturday" ? "10:00 AM" : DeliveryDate. DayOfWeek = "Sunday" ? "12:00 PM" : "9:00 AM"
This if/then statement is simply stating that if the date selected is a Saturday, then the earliest time available is 10:00AM, and if the date is a Sunday, then the earliest time available is 12:00PM. Otherwise, the earlier time available for every other day of the week is 9:00AM.
Then, set the Range Maximum value for your Delivery Time field to the following:
=DeliveryDate.DayOfWeek = "Saturday" ? "3:00 PM" : DeliveryDate.DayOfWeek = "Sunday" ? "3:00 PM" : "5:00 PM"
Now, when the user selects a time on Friday that’s outside of the available time frame, they’ll see an error message:

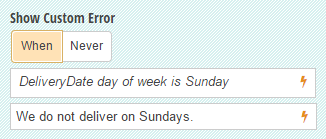
You can adjust these calculations to whatever your business’ operating times are, whether they’re different for every day of the week, or just for one day. There may also be certain days of the week when you don’t deliver at all; in this case, you can go to the Delivery Date field settings and find the Show Custom Error section. With the custom error option, you can specify which day(s) that you don’t deliver in the conditional logic builder, then write your own custom error message to display:
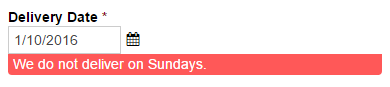
So, when the user selects a Sunday in the Delivery Date field, they won’t be able to continue until they change the date:
Learn more about the Custom Error option in our help topic. Need any help or have any questions about setting business hours on your form? Feel free to contact us!

Nadia A.
Nadia, the Technical Writer for Cognito Forms, develops documentation, support content, and how-to videos. No matter your experience – with her help, you'll be able to take full advantage of the product. In her spare time, Nadia enjoys listening to French house, drinking coffee, and talking about herself in third person.