One thing that really sets Cognito Forms apart from other form builders is the ability to use robust calculations to create powerful, customized forms. Among these calculations, if/then statements can be some of the most useful for both simple and complex scenarios on your forms.
What are if/then statements, and how do I use them?
If/then statements are conditional statements that simply say, “If this happens, then that will happen.” For example: “If I eat the entire pizza, then I will no longer be hungry.” The first part is a hypothesis, and the second part is the conclusion. So, how do we apply these statements to your forms?
In Cognito Forms, you can use if/then statements in the calculation editor to accomplish a variety of different scenarios:
Thank You Messages
Let’s say you have a party registration form, and you want the thank you message on the confirmation page to be different depending on whether the users are planning to attend or not. If you already have a Choice field asking “Will you be attending?” with the options Yes or No, all you need is a hidden calculation field on your form with an if/then statement:
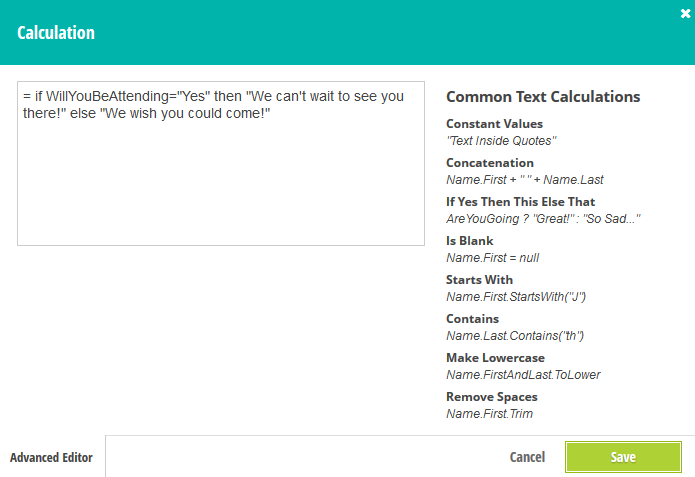
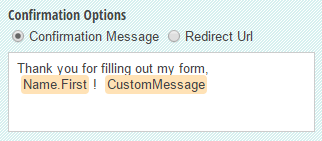
When you break it down, all we’re doing here is specifying what the message will be if the answer is yes, along with a different message if the answer is not yes. With our calculation written, now we just need to insert our calculation field (I named mine “Custom Message”) into the confirmation message:
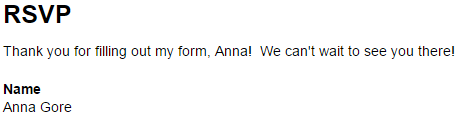
Now, the appropriate message will appear when a user submits their form:
But what about when our choice field has more than two choices? In this case, we just need to add separate if/then statements for each choice:
=(if WillYouBeAttending = "Yes" then "We can't wait to see you there!" else if WillYouBeAttending = "No" then "We wish you could come!" else if WillYouBeAttending = "Maybe" then "We hope you can make it!" else "")
Now, all three choices will display a different message:

Again, make sure to keep the Custom Message field hidden. Finally, you can place the Custom Message field into the confirmation message as before, and each message will display on the confirmation page when its respective choice value is selected on the form.
Quizzes
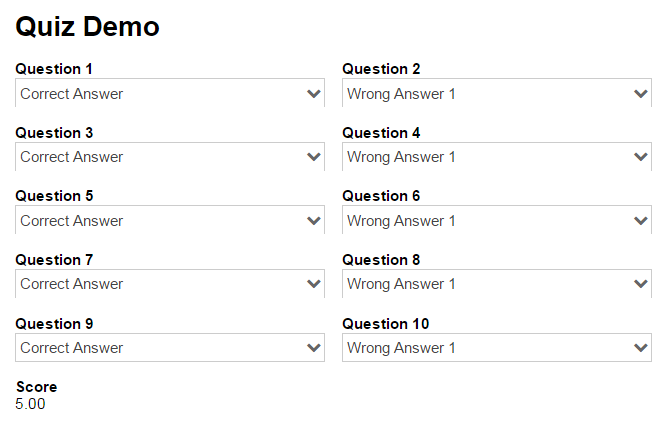
Here’s where you can get a bit more advanced with your if/then statements. In this example, we’re going to create a quiz template that adds up every correct answer for a total score, like so:
To do this, all we need is a calculation field set to the Number type, with the following code set as the default value:
=(if Question1 ="Correct Answer" then 1 else 0) +
(if Question2 = "Correct Answer" then 1 else 0) +
(if Question3 = "Correct Answer" then 1 else 0) +
(if Question4 = "Correct Answer" then 1 else 0) +
(if Question5 = "Correct Answer" then 1 else 0) +
(if Question6 = "Correct Answer" then 1 else 0) +
(if Question7 = "Correct Answer" then 1 else 0) +
(if Question8 = "Correct Answer" then 1 else 0) +
(if Question9 = "Correct Answer" then 1 else 0) +
(if Question10 ="Correct Answer" then 1 else 0)
This calculation may look a bit long, but it’s actually quite simple; all you’re doing is specifying that if the answer is correct, then the student will receive a point. If it’s not correct, then the student will receive zero points. When using this calculation for your real quiz, you just need to replace “Correct Answer” with whatever the actual correct answer of each corresponding question is. You can also adjust the point values to count for as much as you want.
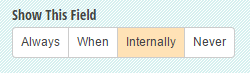
Of course, make sure to change the Score field to only appear internally, so that students cannot see if an answer is correct as they as taking the quiz:
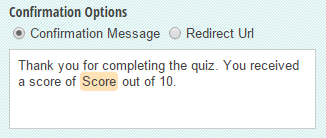
Next, as with our Thank You Message example, you can also insert the score into the confirmation message to let students know their score immediately after they submit their quiz.
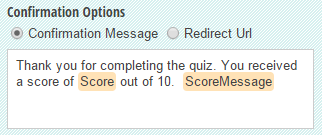
Lastly, to customize the message even more, we can also throw in another calculation field (named “Score Message”) into the confirmation message to display a unique message to each student depending on their score:
=(if Score = 10 then "Awesome job!" else if Score = 9 then "Great job!" else if Score = 8 then "Good job!" else "")
Then, once the field is inserted into the confirmation message:
It will appear to each student when they complete their quiz:
![]()
Need any help or have any questions about using if/then statements on your forms? Feel free to contact us!

Nadia A.
Nadia, the Technical Writer for Cognito Forms, develops documentation, support content, and how-to videos. No matter your experience – with her help, you'll be able to take full advantage of the product. In her spare time, Nadia enjoys listening to French house, drinking coffee, and talking about herself in third person.