After the release of our Custom Error feature at the beginning of this year, many Cognito Forms customers have taken advantage of the ability to implement custom validation rules on their forms.
In a previous post, we discussed the basics of creating custom errors, along with a simple example of how to ensure that two Email fields have the same value. In this post, we’re going to tackle a couple more examples of how you can use the Custom Error option on your forms - including how to make different messages appear depending on which error occurs.
1. Preventing duplicate choices
In some cases, like on a ballot, you may not want the same candidate to be selected more than once. In this case, you can use custom validation to prevent your users from selecting the same option multiple times.
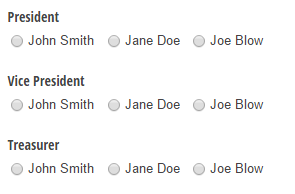
For this example, we’re using three Choice fields: President, Vice President, and Treasurer:
Starting with the second field, Vice President, we’re going to open the Custom Error - When option from the field settings and use the Basic Editor to build the following expression:
=(VicePresident = "John Smith" and President = "John Smith") or
(VicePresident = "Jane Doe" and President = "Jane Doe") or
(VicePresident = "Joe Blow" and President = "Joe Blow")
This expression is just checking off every instance when the President field and the Vice President field could have the same answer.
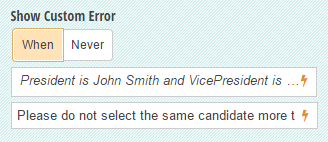
Next, write the message that will appear underneath the field if the error criteria is met:
Follow the same process with the Treasurer field; this time expanding the expression out to include both previous fields:
=(Treasurer = "John Smith" and President = "John Smith") or
(Treasurer = "Jane Doe" and President = "Jane Doe") or
(Treasurer = "Joe Blow" and President = "Joe Blow") or
(Treasurer = "John Smith" and VicePresident = "John Smith") or
(Treasurer = "Jane Doe" and VicePresident = "Jane Doe") or
(Treasurer = "Joe Blow" and VicePresident = "Joe Blow")
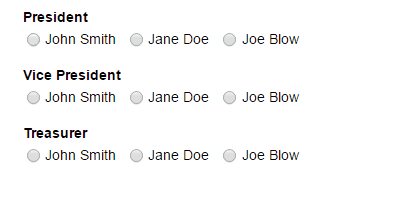
Now, when the same option is selected more than once, an error message will appear in the offending field:
2. Displaying alternate messages
Once you’ve built your custom error expression, you can write a static error message like the one above (“Please do not select the same candidate more than once.”), or you can use the Calculation Editor to create a more dynamic message that changes depending on the error at hand.
For instance, if John Smith is picked twice, you can use a simple if/then statement to create a custom message:
= if VicePresident = "John Smith" and President = "John Smith" then "Please do not select John Smith more than once." else ""
Then, just expand that if/then statement out for the other choice options:
= if VicePresident = "John Smith" and President = "John Smith" then "Please do not select John Smith more than once."
else if VicePresident = "Jane Doe" and President = "Jane Doe" then "Please do not select Jane Doe more than once."
else if VicePresident = "Joe Blow" and President = "Joe Blow" then  "Please do not select Joe Blow more than once." else ""
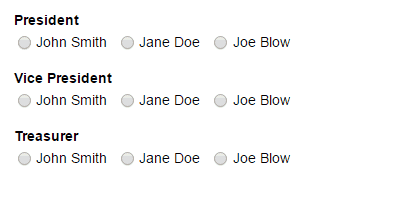
After applying the same process to the Treasurer field, the message will change depending on which candidate is selected:
If/then statements are handy in many different scenarios - check out our blog post to learn more about using if/then statements on your forms.
3. Requiring specific answers
Last but not least, one of the most helpful custom error functions is the ability to require specific answers on your form. This function can apply to a variety of situations - for example, you can use a Textbox field with a simple custom error to password protect your forms. Or, if your business only delivers within a certain area, you can apply a custom error to an Address field to limit the possible range of locations a customer can input. To do this:
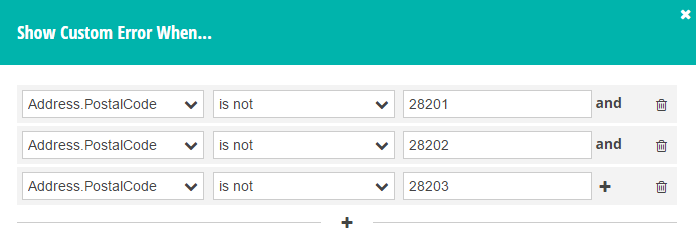
Select your Address field and find the Custom Error - When option in the field settings. From the list of fields, select Address.PostalCode (or whatever the name of your Address field is). Then, set the custom error to appear when a customer inputs a Postal/Zip code that is not part of your designated delivery zone:
Finally, write your custom message, and you’re done!
Have any questions about creating custom validation, or Cognito Forms in general? Contact us today!

Nadia A.
Nadia, the Technical Writer for Cognito Forms, develops documentation, support content, and how-to videos. No matter your experience – with her help, you'll be able to take full advantage of the product. In her spare time, Nadia enjoys listening to French house, drinking coffee, and talking about herself in third person.